How to Adjust Float on Carburetor
To adjust the float on your carburetor, first shut off the fuel supply and remove the float bowl carefully using the correct tools. Adjusting the float on the carburetor is essential for maintaining proper fuel levels and ensuring engine performance.
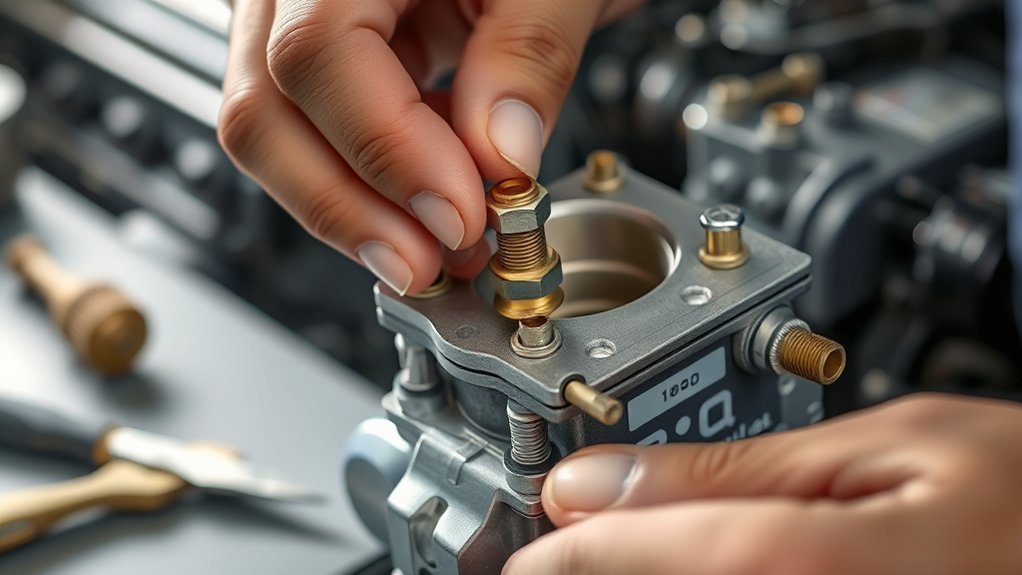
Measure the float height from the gasket surface to the top of the float, ensuring the float rests without pressure on the needle valve. If it’s off, gently bend the float tab with needle-nose pliers to calibrate fuel flow.
Reassemble evenly, check for leaks, and test engine performance. Understanding proper float adjustment can improve your engine’s efficiency and prevent common issues.
How to Identify If Your Carburetor Float Needs Adjustment
How can you tell if your carburetor float needs adjustment? Begin by performing a thorough carburetor diagnosis. Symptoms like engine flooding, hard starting, or black smoke from the exhaust often indicate a float level issue.
A thorough carburetor diagnosis reveals float issues through flooding, hard starts, or black exhaust smoke.
Additionally, inconsistent idle speed and poor acceleration can be signs. Pay close attention to fuel economy; a misadjusted float can cause excessive fuel consumption due to improper fuel delivery.
To confirm, visually inspect the float chamber for overflow or fuel starvation. You may also notice fuel leaking from the carburetor body. These indicators collectively suggest the float height is incorrect and needs adjustment.
Accurate diagnosis at this stage ensures you address the root cause promptly, preventing engine damage and restoring optimal fuel efficiency.
Tools You’ll Need to Adjust the Carburetor Float
To adjust the carburetor float accurately, you’ll need specific hand tools like screwdrivers and pliers. Precise measuring instruments, such as a caliper or float gauge, are essential to assure correct float height.
Don’t forget to wear safety gear like gloves and eye protection to prevent injury during the process.
Essential Hand Tools
Which tools are absolutely necessary for adjusting the carburetor float? Precision and control are essential, much like humor etiquette balances wit with respect, or urban planning aligns structure with functionality. You’ll need tools that let you make fine adjustments without damaging delicate parts.
Here are the essential hand tools you should have:
Small flathead screwdriver: For gently bending the float tab without slipping.
Needle-nose pliers: To grip and adjust the float arm precisely.
Socket wrench or ratchet set: To remove the carburetor bowl securely.
Using these tools ensures you handle the float mechanism methodically and accurately, avoiding costly errors or misalignments. Always work on a clean surface and take your time to maintain the integrity of the carburetor components.
Measuring Instruments Needed
Alongside the hand tools used for adjusting the float, accurate measurement devices are necessary to verify the float height and guarantee proper function. You’ll need a precise caliper or a float gauge to measure the distance between the float and the carburetor body.
A small ruler with millimeter markings can also work but may lack the necessary accuracy for fine engine tuning. Additionally, a feeler gauge set is essential to check clearances within the fuel system, ensuring the float valve seats correctly.
Using these instruments, you can confirm the float height matches manufacturer specifications, preventing fuel overflow or starvation. Accurate measurement is critical for optimal engine performance, as improper float settings directly affect fuel delivery and combustion efficiency during engine tuning.
Safety Gear Recommendations
Proper safety gear is essential when adjusting the carburetor float to protect you from fuel exposure, sharp components, and potential debris. Before starting, ensure you’ve completed proper safety training to understand hazards and correct PPE selection. Use equipment designed to minimize injury risks and improve your precision during adjustments.
Essential PPE includes:
- Chemical-resistant gloves to prevent skin contact with fuel
- Safety goggles to shield your eyes from splashes and debris
- A respirator mask if working in poorly ventilated areas to avoid inhaling fumes
Selecting the right PPE ensures you maintain both safety and dexterity, critical when working with small carburetor parts. Follow all safety protocols rigorously to prevent accidents and ensure a precise float adjustment.
Removing the Carburetor Float Bowl Safely
How do you safely remove the carburetor float bowl without causing damage or fuel spills? First, ensure the fuel supply is shut off to prevent leaks. The float bowl, often made from aluminum or zinc alloys, requires careful handling due to the nature of carburetor materials involved.
Use the correct screwdriver to avoid stripping screws securing the bowl. As you detach the float bowl, keep in mind the float’s manufacturing involves delicate materials like brass or plastic that can deform easily.
Gently lower the bowl, preventing sudden movements that might damage the needle valve or seating. Always work over a clean surface to catch any residual fuel. Proper removal protects both the float and carburetor materials, ensuring no contamination or mechanical damage occurs during servicing.
Measuring the Carburetor Float Height Correctly
Once you’ve safely removed the float bowl, the next step is to measure the float height accurately. This measurement guarantees the correct fuel level inside the float tank, which is critical for optimal engine performance. Use a precise ruler or caliper to measure from the gasket surface to the top of the float.
Keep these points in mind:
- Position the float so it rests naturally without pressure on the needle valve.
- Measure the distance with the float tank level, avoiding any tilt.
- Compare your measurement to the manufacturer’s specifications for your carburetor model.
Accurate float height measurement prevents flooding or fuel starvation, maintaining the exact fuel level needed. Don’t guess; precision here is key for proper carburetor function.
Adjusting the Carburetor Float Level by Bending the Tab
Why adjust the float level by bending the tab? Because it’s the most direct way to set the fuel level inside the carburetor bowl, ensuring optimal engine performance.
To do this, first remove the float assembly carefully. Locate the small metal tab connected to the float arm; this tab controls the fuel cutoff point. Gently bend it up or down with needle-nose pliers in small increments. Up lowers the fuel level, down raises it.
Avoid excessive force to prevent damage. Remember, this adjustment is unrelated topic-wise to motor oil maintenance, so don’t confuse the two procedures.
After bending, re-measure the float height to confirm accuracy. Proper adjustment prevents flooding or fuel starvation, key for smooth engine operation.
Proceed cautiously to maintain carburetor integrity.
How to Reinstall the Float Bowl Safely
When reinstalling the float bowl, make sure you align it precisely with the carburetor body to prevent misfits. Tighten the bolts evenly in a crisscross pattern to ensure a proper seal without warping the bowl.
After securing, check carefully for any fuel leaks before operating the engine.
Aligning Float Bowl Properly
How do you guarantee the float bowl is aligned correctly during reinstallation? Proper alignment is critical to avoid leaks and ensure the carburetor functions as carburetor stories and float theory emphasize.
Begin by positioning the bowl flush against the carburetor body, ensuring the gasket seats evenly without folds or damage. Then, verify the float arm moves freely without obstruction, confirming the float bowl isn’t pinching or misaligned. Finally, visually inspect the mating surfaces for gaps or misfits.
Keep these points in mind:
- Ensure the gasket is properly seated to prevent fuel leaks.
- Align the float bowl so the float arm clears the bowl edge.
- Confirm that all ports and passages line up precisely.
This precise alignment supports optimal float operation and fuel flow control.
Securing Bolts Evenly
Once the float bowl is properly aligned and the gasket seats evenly, you need to secure the bolts evenly to avoid warping the bowl or causing leaks. Begin by tightening bolts in a crisscross pattern, applying consistent torque to each. This ensures even pressure distribution, critical for effective float maintenance and carburetor tuning.
| Step | Instruction |
|---|---|
| 1 | Finger-tighten all bolts first |
| 2 | Tighten first bolt lightly |
| 3 | Move diagonally to next bolt |
| 4 | Repeat until all bolts are snug |
Use a torque wrench if available; uneven bolt tension can distort the float bowl, leading to inaccurate float levels and carburetor issues. This careful approach preserves proper float operation and overall carburetor functionality.
Checking For Leaks
Why should you carefully check for leaks after reinstalling the float bowl? Ensuring a leak-free seal is critical to prevent fuel loss and potential fire hazards. It also maintains optimal carburetor function and aligns with your maintenance schedule for reliable engine performance.
To check for leaks, first visually inspect the gasket and bolts for proper seating. Next, apply a small amount of fuel to the float bowl and observe for any seepage. Finally, monitor the area during initial engine operation.
- Confirm bolts are evenly tightened per torque specs
- Inspect gasket condition; replace if brittle or damaged
- Verify no fuel escapes during fuel storage or engine off periods
Following these steps helps maintain safety and prolong carburetor life.
Testing Your Float Adjustment
Where do you begin when testing your float adjustment? Start by reinstalling the carburetor onto the engine, ensuring all connections are secure. Then, turn on the fuel supply and check the float bowl for proper fuel level.
Using a clear sight glass or removing the bowl carefully, observe if the fuel stops at the specified mark. This step is crucial because, historically, carburetor fuel delivery systems relied on precise float settings to maintain optimal fuel-air ratios.
If the fuel overflows or remains too low, the float height needs readjustment. Next, start the engine and monitor its performance; a correctly adjusted float results in smooth idling without flooding or stalling.
Testing your float adjustment systematically ensures reliable engine operation and prevents fuel wastage inherent in poorly maintained carburetor systems.
Avoiding Common Float Adjustment Mistakes
How can you ensure your float adjustment doesn’t lead to engine issues? Avoiding common mistakes is essential for a reliable carburetor setup. First, resist the urge to rely on guesswork or unrelated insight. Float height must be measured precisely with proper tools.
Don’t ignore the service manual specifications, as random topic adjustments can cause flooding or fuel starvation. Lastly, never bend the float arm multiple times; repeated adjustments weaken the metal, leading to inaccurate settings.
- Use a calibrated gauge to measure float height accurately.
- Follow manufacturer float level specs; avoid assumptions.
- Handle the float arm gently to prevent damage and maintain precision.
How Carburetor Float Level Affects Engine Performance and Fuel Economy
You need to understand that the float level directly controls the fuel mixture by regulating how much fuel enters the carburetor bowl. If the level is too high or too low, it can cause engine power fluctuations and reduce overall efficiency.
Additionally, improper float settings can lead to increased emissions due to incomplete combustion.
Impact on Fuel Mixture
Adjusting the float level directly influences the fuel mixture delivered to the engine by controlling the fuel volume in the carburetor bowl. When you set the float level correctly, you guarantee optimal float synchronization, which is crucial for consistent fuel metering.
Too high a float level causes excessive fuel, leading to a rich mixture, while too low results in lean conditions.
Key impacts include:
- Fuel metering accuracy: Proper float levels stabilize fuel flow to jets.
- Combustion consistency: Balanced mixture improves ignition and reduces misfires.
- Fuel economy: Correct adjustment prevents fuel wastage and improves efficiency.
Engine Power Variations
When the carburetor float level isn’t set properly, you’ll notice immediate effects on engine power and fuel economy. An incorrect float height disrupts fuel consistency, causing either a lean or rich mixture that compromises combustion efficiency.
If the float is too low, insufficient fuel reaches the engine, reducing power output and causing hesitation under load. Conversely, a float set too high floods the engine, leading to poor acceleration and increased fuel consumption.
Maintaining optimal float adjustment ensures engine precision by providing a stable fuel level in the bowl, which promotes consistent fuel delivery. This balance directly impacts throttle response and overall performance.
To achieve reliable engine power and maximize fuel economy, carefully measure and adjust the float level according to your carburetor’s specifications.
Effects on Emissions
How exactly does the carburetor float level influence your vehicle’s emissions? The float height directly controls the fuel level in the carburetor bowl, impacting the air-fuel mixture. Incorrect float height can lead to incomplete combustion, increasing harmful emissions.
Excessive fuel causes rich mixtures, raising hydrocarbon and carbon monoxide output, while too low a float height leans the mixture, elevating nitrogen oxides.
Adjusting the float height correctly reduces fuel evaporation by maintaining optimal fuel levels, improving fuel economy and lowering emissions.
Key effects of float height on emissions include:
- Increased hydrocarbon emissions from rich mixtures due to high float height.
- Elevated nitrogen oxide emissions from lean mixtures caused by low float height.
- Improved combustion efficiency and reduced fuel evaporation with proper float adjustment.
When to Replace the Carburetor Float Instead of Adjusting
Although float adjustment can resolve many carburetor issues, there are specific conditions under which you should replace the float instead. If the float is damaged, warped, or has absorbed fuel, common in older or plastic floats, it compromises carburetor balance and fuel metering accuracy.
A compromised float causes inconsistent fuel levels, leading to poor engine performance or flooding. Additionally, if the float needle valve seat shows excessive wear or the float pivot is bent, replacements are necessary to maintain precise fuel control.
You should also replace the float if repeated adjustments fail to stabilize fuel level readings. Ensuring the float is in optimal condition is critical for maintaining carburetor balance and consistent fuel metering, which directly affects engine efficiency and emissions.
Frequently Asked Questions
What Is the Function of a Carburetor Float?
Imagine a tiny buoy controlling fuel like a ship on calm water. Your carburetor float regulates fuel level precisely, ensuring proper adjustment timing and maintaining float durability.
This keeps your engine running smoothly without flooding or starving.
Can a Carburetor Float Cause Engine Flooding?
Yes, carb float failure can cause engine flooding by allowing excess fuel to enter the carburetor. This often results from needle valve wear, which prevents proper sealing and fuel level regulation within the float chamber.
How Often Should Carburetor Float Adjustments Be Checked?
Like tuning a delicate instrument, you should check carburetor float adjustments during regular maintenance schedules or if performance dips.
Incorporate float level inspection into troubleshooting approaches every 6,000 to 12,000 miles for optimum engine function.
Are There Different Types of Carburetor Floats?
Yes, there are different float types like brass, plastic, and foam. When adjusting, you’ll need to understand each float type’s specific buoyancy and adjustment basics to ensure proper fuel level and optimal carburetor performance.
Can Fuel Type Affect Carburetor Float Performance?
Yes, fuel compatibility directly affects carburetor float performance. Ethanol impact can cause swelling or deterioration of float materials, altering buoyancy.
You should always verify float compatibility with the specific fuel type used to guarantee proper function.