How Do I Test a Fuel Gauge
To test your fuel gauge, start by checking the fuse and inspecting wiring for loose or corroded connections. Use a multimeter to check for voltage at the gauge terminals with the ignition on.
Next, test the sending unit by measuring resistance as you move its float arm—values should change smoothly. Look for wiring issues like frayed cables or moisture that cause flickering.
If problems persist, deeper diagnostics or part replacement might be needed. Keep exploring to learn how to tackle each step thoroughly.
Key Takeaways
- Check the fuse box for a blown fuse related to the fuel gauge before deeper testing.
- Inspect wiring and connectors for corrosion, looseness, or damage causing gauge issues.
- Use a multimeter to measure voltage at the gauge terminals with ignition on to verify power.
- Test the sending unit resistance by moving the float arm and observing smooth resistance changes.
- Decide repair or replacement based on damage extent, cost, and frequency of fuel gauge failures.
Quick Checks for Common Fuel Gauge Problems
Before diving into complex diagnostics, start with quick checks that often reveal common fuel gauge issues. First, check your vehicle’s fuse box for a blown fuse related to the fuel gauge. A blown fuse can easily disrupt the gauge’s function.
Next, inspect the wiring connections behind the dashboard and under the hood for any loose or corroded terminals; these can cause intermittent or false readings. Also, pay attention to the gauge itself. Sometimes the needle gets stuck or the gauge malfunctions internally.
Finally, make sure your battery is fully charged since low voltage can affect the fuel gauge’s accuracy. These simple steps can save you time and help you decide if you need to dig deeper or call a professional.
How to Test the Fuel Gauge Sending Unit in Your Tank
Wondering how to check if your fuel gauge sending unit is working properly? First, locate the sending unit, usually mounted inside the fuel tank or accessed through a panel under the rear seat or trunk.
To check your fuel gauge sending unit, first locate it inside the fuel tank or under the rear seat or trunk.
Disconnect the wiring harness from the sending unit. Using a multimeter set to measure resistance (ohms), connect the probes to the sending unit terminals.
Slowly move the float arm through its full range. You should see the resistance change smoothly without any sudden jumps or drops.
If the resistance doesn’t change or jumps erratically, the sending unit is likely faulty. Always compare your readings to the vehicle’s service manual specifications.
Reconnect everything once testing is complete, and proceed to other diagnostics if needed.
How to Spot Wiring and Connector Problems in Your Fuel System
How can you tell if wiring or connectors are causing issues in your fuel system? First, inspect the wiring harness and connectors for visible damage like frayed wires, corrosion, or loose connections. Damaged insulation or exposed wires can disrupt signals to your fuel gauge.
Next, gently wiggle connectors while observing the fuel gauge; if the gauge flickers or changes, you’ve likely found a faulty connection. Also, look for signs of moisture or rust around connectors, which can cause intermittent problems. Make sure connectors fit snugly and aren’t loose.
Finally, check for any burnt smells or discoloration near wiring, indicating overheating or short circuits. Fixing these issues often resolves erratic fuel gauge readings without needing advanced tools.
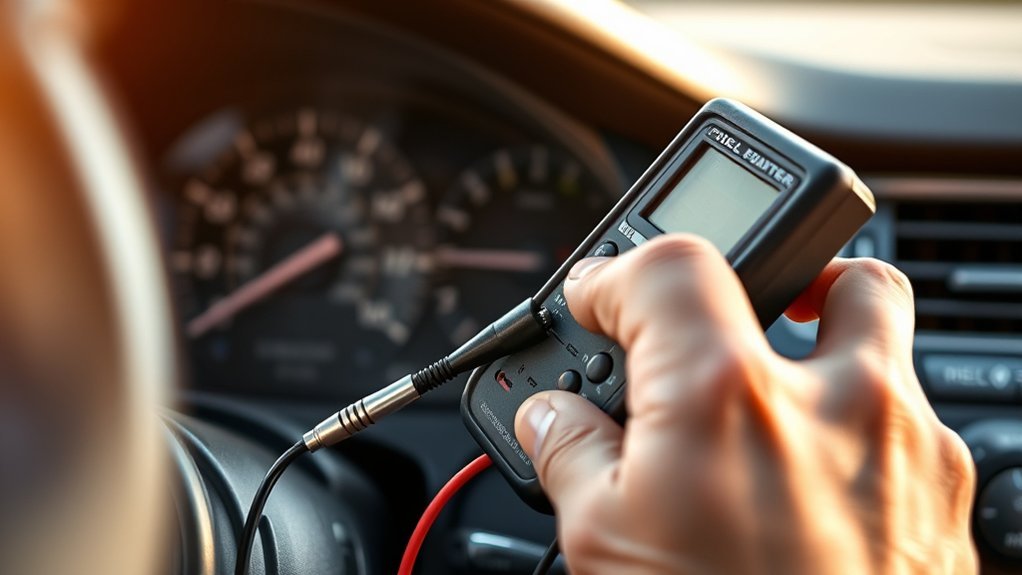
How to Use a Multimeter to Test Your Fuel Gauge
A multimeter is an essential tool for diagnosing issues with your fuel gauge by measuring electrical values like voltage, resistance, and continuity. First, set your multimeter to the voltage setting and turn your vehicle’s ignition on without starting the engine.
Probe the fuel gauge terminals to check if it’s receiving voltage; a lack of voltage suggests wiring or fuse problems. Next, switch to the resistance (ohms) setting and measure the resistance across the fuel sending unit’s terminals.
Compare this reading to the manufacturer’s specifications to determine if the sending unit is faulty. Finally, use the continuity test to check for broken circuits in the wiring harness. By following these steps, you can pinpoint electrical faults affecting your fuel gauge’s performance efficiently.
Deciding When to Repair or Replace Fuel Gauge Parts
When should you repair your fuel gauge parts, and when is replacement the better option? You’ll want to repair if the issue is minor and cost-effective, like loose wiring or a faulty connection. However, replacement is the way to go when parts are extensively damaged or unreliable after multiple fixes.
Consider these factors to decide:
- Age and condition: Older gauges with wear may need replacement for reliability.
- Cost of repair vs. replacement: Sometimes new parts save money long-term.
- Frequency of failure: Repeated breakdowns signal it’s time to replace.
Frequently Asked Questions
What Causes a Fuel Gauge to Fluctuate Randomly While Driving?
Your fuel gauge fluctuates randomly because of a faulty fuel sending unit, loose wiring, or a bad ground connection.
You should check these components to fix inconsistent readings while driving and ensure accurate fuel level monitoring.
Can Temperature Changes Affect Fuel Gauge Accuracy?
You might not expect it, but yes, temperature changes can mess with your fuel gauge’s accuracy.
As metal and fuel expand or contract, your gauge readings can shift, leaving you wondering if it’s really empty or not.
How Does the Fuel Gauge System Differ in Electric Vehicles?
In electric vehicles, your fuel gauge is actually a battery charge indicator. It measures your battery’s state of charge electronically, unlike traditional fuel gauges that measure liquid fuel levels mechanically or electrically.
Are There Smartphone Apps to Monitor Fuel Gauge Readings?
Think of your smartphone as a digital dashboard. Yes, you can use apps like Fuelio or Drivvo to monitor fuel levels, track consumption, and even get alerts, keeping you connected to your car’s lifeblood anytime, anywhere.
What Safety Precautions Should I Take When Testing the Fuel Gauge?
You should disconnect the battery, work in a well-ventilated area, avoid open flames, wear gloves and safety glasses, and keep a fire extinguisher nearby.
Always follow your vehicle’s manual instructions carefully to stay safe.
Conclusion
Now that you know how to check for common issues, test the sending unit, inspect wiring, and use a multimeter, you’re ready to tackle your fuel gauge problems. You can diagnose, you can repair, and you can decide whether to replace parts with confidence.
With these steps, you’ll keep your fuel gauge accurate, your drives worry-free, and your vehicle running smoothly. Don’t wait—take control of your fuel system today! Testing a fuel gauge properly ensures reliability and peace of mind on every trip.