How to Use Carburetor Cleaner
To use carburetor cleaner effectively, first ensure the engine is cool and the battery is disconnected. Wearing safety gloves and goggles is essential, and you should always work in a well-ventilated area.
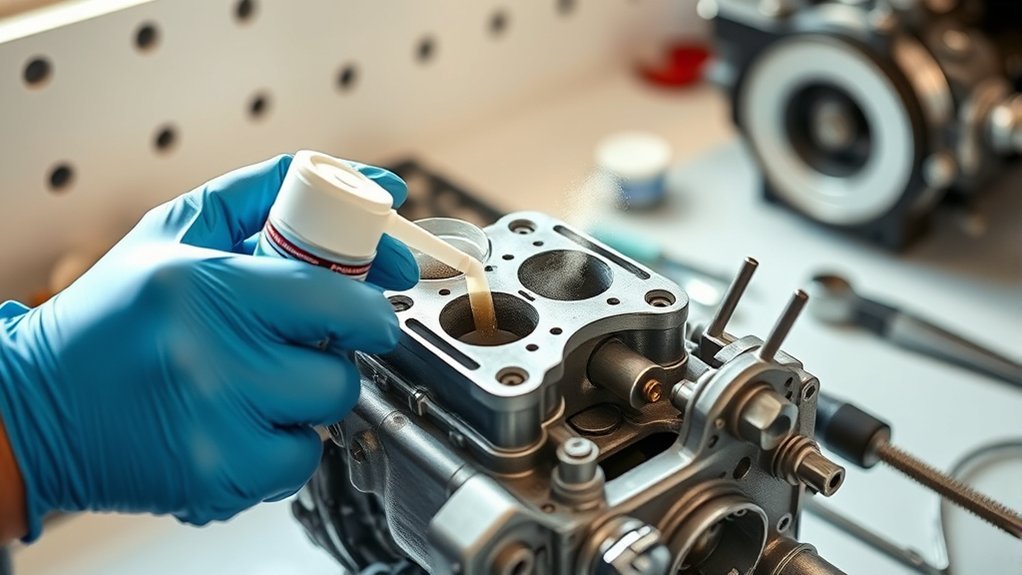
Spray the cleaner sparingly on clogged jets and affected parts without soaking the entire unit. Let it dwell for 5 to 15 minutes, depending on the severity of the deposits. Then, scrub the area or repeat the process if necessary.
Avoid overusing the cleaner to protect seals from damage. After cleaning, reassemble the carburetor and test for a smooth idle. Proper technique prevents damage and ensures better performance—explore detailed steps to perfect the process.
Signs Your Carburetor Needs Cleaning
How can you tell when your carburetor needs cleaning? First, inspect for performance issues like rough idling, stalling, or hesitation during acceleration. These symptoms often indicate clogged jets or passages.
Watch for rough idling, stalling, or hesitation—clear signs your carburetor jets may be clogged and need cleaning.
Next, examine the carburetor aesthetics; dirt buildup, varnish, or fuel residue on the exterior suggest internal contamination. Additionally, look for unusual engine paintwear near the carburetor, which can signal fuel leaks or overheating due to improper fuel-air mixture.
If you notice black smoke from the exhaust or increased fuel consumption, it further confirms carburetor malfunction. Monitoring these signs helps you address carburetor issues promptly, preventing engine damage and maintaining efficiency.
Early detection through these technical indicators ensures your engine runs smoothly without unnecessary repairs.
What You’ll Need for Carburetor Cleaning
What tools and materials should you gather before cleaning your carburetor? To debunk common carburetor myths and ensure efficiency, you need the right supplies. While cleaner alternatives exist, a dedicated carburetor cleaner remains the most effective.
Prepare the following essentials for a smooth process:
| Tool/Material | Purpose |
|---|---|
| Carburetor cleaner | Dissolves varnish and deposits |
| Safety gloves | Protects your skin |
| Eye protection | Prevents chemical splashes |
| Small brushes | Removes stubborn grime |
Avoid substitute solvents that might damage components or leave residues. Having these ready ensures you clean thoroughly and safely without guesswork. This setup will streamline your carburetor maintenance, improving engine performance and longevity.
How to Prepare Your Engine for Carburetor Cleaning
Before you start cleaning, make sure the engine is completely cool to prevent burns and avoid fire hazards.
Follow a safety precautions checklist, including disconnecting the battery and working in a well-ventilated area. These steps ensure a safe and effective carburetor cleaning process.
Safety Precautions Checklist
Why is safety your top priority when preparing your engine for carburetor cleaning? Handling carburetor cleaner involves risks like chemical exposure and fire hazards. You must wear appropriate safety gear, such as gloves, goggles, and a mask, to protect your skin, eyes, and lungs from harmful fumes and liquids. Work in a well-ventilated area to minimize inhalation risks.
Here’s a quick safety checklist:
| Step | Action | Purpose |
|---|---|---|
| Wear Safety Gear | Gloves, goggles, mask | Prevent chemical exposure |
| Ventilate Area | Open windows or use fans | Reduce inhalation of fumes |
| Eliminate Ignition | Turn off engine, no smoking | Avoid fire or explosion risk |
Follow these precautions to ensure a safe carburetor cleaning process.
Engine Cooling Procedures
How long should you let your engine cool down before starting the carburetor cleaning? Ideally, you should allow the engine to cool for at least 30 minutes, ensuring it reaches a safe temperature to avoid burns or damage to components. Proper engine cooling is essential for effective carburetor maintenance and preserving engine efficiency.
Before you begin, disconnect the spark plug wire to prevent accidental starts. Verify the engine is cool to the touch, especially around the carburetor and fuel lines. Cooling prevents volatile fuel residues from igniting during cleaning and protects sensitive parts from thermal shock.
Taking these steps ensures a safer, more efficient cleaning process, ultimately supporting optimal engine performance and prolonging the lifespan of your carburetor and related systems.
How to Apply Carburetor Cleaner Safely
Where should you start when applying carburetor cleaner to ensure safety? First, work in a well-ventilated area to avoid inhaling harmful fumes. Always wear protective gloves and safety glasses to prevent skin and eye contact. Avoid any open flames or sparks because carburetor cleaner is highly flammable.
Before application, disconnect the battery to eliminate electrical hazards. Use the cleaner sparingly, targeting affected areas precisely rather than oversaturating. Proper application supports better performance and complements fuel additives without causing damage.
After cleaning, consider emissions testing to verify that the cleaner hasn’t adversely affected the engine’s output. Store the carburetor cleaner in a cool, dry place away from children and pets. Following these steps will ensure you apply carburetor cleaner effectively while maintaining safety for yourself and your vehicle.
How Long to Let Carburetor Cleaner Work
Once you’ve sprayed the carburetor cleaner onto the affected parts, you’ll want to let it sit for a specific amount of time to break down deposits effectively. The dwell time depends on the severity of buildup and the type of carburetor fuels residue.
Typically, 5 to 15 minutes is sufficient for most engine maintenance tasks. Avoid letting the cleaner dry out, which can leave residues behind.
| Deposit Severity | Recommended Dwell Time |
|---|---|
| Light | 5 minutes |
| Moderate | 10 minutes |
| Heavy | 15 minutes |
| Extreme | Repeat application |
Monitoring the time ensures optimal cleaning without damaging sensitive carburetor components, improving performance and prolonging engine life.
How to Clean Carburetor Parts Thoroughly
You’ll need to fully disassemble the carburetor to access all components for cleaning. Soak the parts in carburetor cleaner to break down deposits, then use a brush to scrub off stubborn grime.
This ensures every passage and surface is free of buildup for optimal performance.
Disassemble Carburetor Components
Several key components must be carefully disassembled to clean a carburetor thoroughly. Since the carburetor history involves various designs, understanding your model helps in proper fuel system inspection and disassembly.
Begin by removing the float bowl, jets, and throttle linkage, noting their positions for reassembly. Use a clean workspace to avoid losing small parts.
| Component | Tool Needed | Notes |
|---|---|---|
| Float Bowl | Screwdriver | Drain fuel before removal |
| Jets | Wrench/Needle | Handle carefully, avoid damage |
| Throttle Linkage | Pliers | Mark position for reassembly |
| Needle Valve | Small Wrench | Inspect for wear or debris |
Disassemble methodically to prevent damage and ensure efficient cleaning when you proceed to soak and scrub parts.
Soak And Scrub Parts
After carefully disassembling the carburetor components, the next step is to soak and scrub each part to remove built-up varnish, dirt, and deposits that impair performance. Submerge the metal parts in carburetor cleaner for about 15-30 minutes to loosen contaminants affecting fuel delivery.
Avoid soaking rubber or plastic pieces, as the solvent can damage them. After soaking, use a soft-bristle brush or toothbrush to scrub critical areas, such as jets, passages, and the throttle body, ensuring all residue is eliminated.
Pay special attention to the idle adjustment screws and related passages, as blockages here disrupt engine idling. Rinse parts with clean solvent or compressed air to clear loosened debris. Thorough cleaning ensures smooth fuel flow and precise idle adjustment, restoring optimal carburetor function.
How to Reassemble and Test Your Carburetor
Reassembling your carburetor requires careful alignment of all components to guarantee proper function. Begin by positioning gaskets and jets precisely, ensuring no debris remains. Reattach the float, needle valve, and throttle linkage, then secure the carburetor bowl.
Proper carburetor timing and fuel mixture adjustments depend on precise reassembly. Afterward, mount the carburetor back on the engine.
To test, start the engine and observe idle quality, responsiveness, and exhaust. Adjust the fuel mixture screws for smooth performance and correct carburetor timing as needed.
| Step | Component | Action |
|---|---|---|
| 1 | Gaskets & Jets | Align & seal |
| 2 | Float & Needle Valve | Position precisely |
| 3 | Throttle Linkage | Reattach securely |
| 4 | Carburetor Bowl | Tighten firmly |
| 5 | Engine Mounting | Reinstall & test |
How to Avoid Common Mistakes When Using Carburetor Cleaner
To avoid common mistakes, don’t overuse the carburetor cleaner, as excess can damage components. Always wear proper safety gear like gloves and goggles to protect yourself from harmful chemicals.
Finally, follow the manufacturer’s instructions carefully to ensure effective and safe cleaning.
Avoid Overusing Cleaner
How much carburetor cleaner is too much when servicing your engine? Overusing it can cause damage rather than improve performance. Don’t fall for carburetor myths that suggest flooding the system will fix everything. Instead, follow these guidelines:
- Use only the recommended amount specified on the product label to avoid residue buildup.
- Avoid mixing carburetor cleaner with fuel additives, as they can react adversely.
- Apply cleaner directly to affected parts rather than soaking the entire carburetor.
- Limit cleaning frequency; excessive use can degrade rubber seals and gaskets.
Use Proper Safety Gear
A critical step when using carburetor cleaner is wearing the proper safety gear to protect yourself from harmful chemicals and fumes. Always put on safety goggles to shield your eyes from splashes and airborne particles, which can cause severe irritation or injury.
Rubber gloves are essential to prevent skin contact with the cleaner’s corrosive agents, reducing the risk of burns or allergic reactions. Ensure your gloves are chemical-resistant and intact before use.
Additionally, work in a well-ventilated area to minimize inhalation risks, but the primary defense remains your protective gear. Neglecting these precautions can lead to serious health issues.
Follow Manufacturer Instructions
Why should you always follow the manufacturer’s instructions when using carburetor cleaner? Carburetor symbolism lies in its precise function, especially in vintage engines where tolerance is tight. Deviating from guidelines risks damage or ineffective cleaning.
To avoid common mistakes:
- Use the recommended cleaner type. Different formulas suit various carburetor materials.
- Apply the cleaner in specified amounts to prevent corrosion or residue buildup.
- Follow timing instructions strictly; overexposure can degrade seals or gaskets.
- Ensure proper ventilation and disposal as directed to maintain safety and environmental standards.
How Often to Clean Your Carburetor for Best Performance
When should you clean your carburetor to maintain optimum engine performance? Despite many carburetor myths and cleaning myths, regular maintenance depends on usage and conditions rather than arbitrary schedules. Typically, cleaning every 12,000 miles or annually is sufficient unless symptoms appear.
| Symptom | Action Needed |
|---|---|
| Rough idling | Clean immediately |
| Poor acceleration | Inspect and clean |
| Black smoke | Check carburetor |
| Hard starts | Clean and adjust |
| No issues | Clean annually or as per usage |
Ignoring signs can reduce efficiency and cause engine damage. Use carburetor cleaner as preventive maintenance to avoid buildup. Don’t over-clean; unnecessary cleaning can damage delicate parts. Stick to a practical schedule based on your engine’s performance and operating environment.
Troubleshooting Common Carburetor Issues After Cleaning
Following proper cleaning intervals helps prevent buildup and maintains engine efficiency, but even after cleaning, carburetor issues can persist or arise. If you notice carburetor symptoms like rough idling or hesitation, perform fuel system diagnostics to pinpoint problems.
Regular cleaning helps, but carburetor issues like rough idling may still require thorough diagnostics to identify.
Here’s how to troubleshoot common issues:
- Check for clogged jets or passages. Residual debris can block fuel flow.
- Inspect the float level. Improper adjustment affects fuel delivery.
- Examine the choke mechanism for proper operation. Sticking can cause fuel-air imbalance.
- Verify vacuum leaks around gaskets or hoses that disrupt fuel metering.
Systematic diagnostics help you isolate faults quickly, ensuring consistent engine performance post-cleaning. Addressing these areas will resolve most carburetor-related symptoms and keep your fuel system functioning optimally.
Frequently Asked Questions
Can Carburetor Cleaner Damage Rubber or Plastic Parts?
Ever wonder if carburetor cleaner is a double-edged sword? Yes, it can damage rubber or plastic parts if the solvent compatibility isn’t right.
Always check carburetor materials to avoid costly deterioration or malfunction.
Is Carburetor Cleaner Safe for Use on Fuel-Injected Engines?
You shouldn’t use carburetor cleaner on fuel-injected engines because, unlike carburetor history indicates, engine chemistry in fuel injection systems demands specific cleaners to avoid damage to sensors and seals. This ensures optimal performance and longevity.
What Are the Environmental Impacts of Carburetor Cleaner Disposal?
You’re steering through a chemical storm. Improper carburetor cleaner disposal can breach environmental policy and disrupt waste management systems.
Always follow guidelines to prevent toxic runoff, protecting ecosystems and complying with regulations for sustainable handling.
Can I Use Carburetor Cleaner to Remove Rust From Metal Parts?
You can use carburetor cleaner for rust removal on metal parts, but it’s mainly designed for cleaning fuel systems.
For effective metal restoration, consider specialized rust removers or rust converters that better protect and treat corrosion.
Are There Alternatives to Carburetor Cleaner for Engine Maintenance?
While carburetor cleaner excels at dissolving deposits, you can choose alternative solvents like brake cleaner or specialized engine degreasers for engine maintenance. These offer varied chemical properties, enhancing cleaning effectiveness and reducing potential damage risks.