How to Remove Carburetor
To remove your carburetor, start by gathering the right tools, including wrenches and screwdrivers. Proper preparation of your vehicle is essential, so begin by disconnecting the battery and clearing access to the carburetor area.
Carefully detach the fuel lines and throttle linkages, taking care to avoid any damage or fuel spills. Next, loosen the mounting bolts securing the carburetor.
Lift the carburetor straight off the intake manifold and immediately cover the opening to prevent debris from entering. Keep gaskets and surfaces clean to prevent leaks.
Following these steps ensures safe removal and sets you up for inspection, troubleshooting, and reinstallation guidance.
Gather Tools and Materials for Carburetor Removal
Before you begin removing the carburetor, what tools and materials will you need? Start by assembling a basic mechanic’s toolset: screwdrivers (flat and Phillips), wrenches, and pliers. You’ll also require a socket set compatible with your vehicle’s hardware.
Have replacement gasket material ready, as the old gasket must be replaced to ensure a proper seal upon reinstallation. A clean container for draining fuel is essential to avoid spills during disconnection. Include safety gloves and eye protection.
Additionally, a fuel system diagnosis tool can help confirm that carburetor removal is necessary and assist in troubleshooting. Gathering these tools and materials before starting ensures a smooth, efficient removal process without interruptions or damage to components.
Prepare Your Vehicle and Engine for Removal
Before starting, disconnect your vehicle’s battery to prevent electrical hazards. Next, remove or reposition any components obstructing access to the carburetor. This will ensure a clear workspace for efficient removal.
Disconnect Battery Safely
Since the battery powers your vehicle’s electrical system, disconnecting it safely is essential to prevent accidental shorts or shocks while working on the carburetor. Prioritize battery safety by wearing insulated gloves and eye protection.
First, identify the negative terminal, usually marked with a minus (-) sign or black cable. Loosen the clamp nut using the appropriate wrench, then carefully remove the negative cable to ensure electrical isolation. This step minimizes risk of sparks or damage to electronic components.
| Step | Tool Needed | Safety Tip |
|---|---|---|
| Locate battery | Flashlight (if dark) | Verify terminal markings |
| Loosen clamp | Wrench or socket | Avoid metal contact |
| Remove cable | Insulated gloves | Disconnect negative first |
Follow these instructions precisely to maintain battery safety and achieve proper electrical isolation.
Clear Surrounding Components
With the battery safely disconnected to prevent electrical hazards, your next step is to clear the components surrounding the carburetor. Begin by removing any air filters, hoses, linkages, and vacuum lines attached to the carburetor, labeling each for easy reassembly.
Use proper tools to loosen clamps and fittings without damaging connectors. Be cautious to avoid disturbing unrelated topics such as fuel injectors or ignition systems, which don’t directly affect carburetor removal.
Document your process with photos or notes; these discussion ideas help prevent confusion later. Keep all removed parts organized and separate.
Clearing these components ensures unobstructed access, reducing the risk of damage or errors during removal. This preparation is critical for a smooth, efficient carburetor extraction and subsequent servicing.
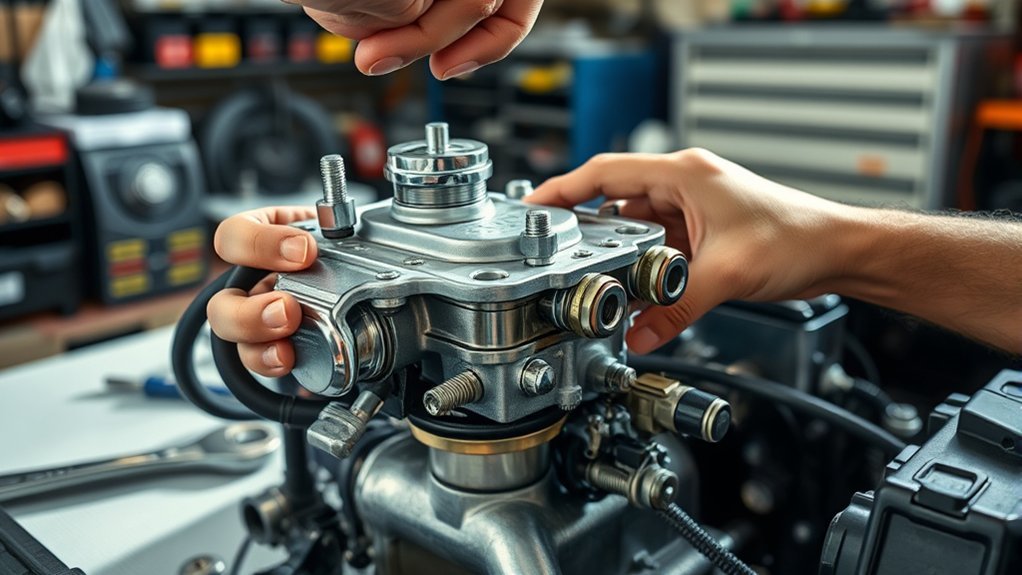
Disconnect Carburetor Fuel Lines and Linkages
You’ll first need to identify the fuel line connections on the carburetor to prevent leaks or damage. Carefully detach the throttle linkages, ensuring they don’t bind or snap during removal.
Use appropriate tools to loosen clamps and connectors without forcing any components.
Identifying Fuel Line Connections
How do you accurately identify the fuel line connections on your carburetor? First, locate the inlet fuel line, usually a larger hose attached to the carburetor’s fuel bowl or inlet fitting. It supplies gasoline from the fuel pump.
The outlet or return line, if present, is typically smaller and routes excess fuel back to the tank. Avoid getting distracted by irrelevant topics like unrelated discussion on vacuum hoses or electrical wiring, which don’t pertain to fuel line identification.
Use a flashlight to clearly see fittings and check for labeling or color-coded lines. Carefully note hose routing and clamp types before disconnecting. This ensures correct reassembly and prevents fuel leaks.
Confirm connections visually and by consulting your vehicle’s service manual for model-specific details.
Detaching Throttle Linkages Safely
Several connections must be carefully detached when removing the carburetor, including throttle linkages and fuel lines. To detach the throttle linkage safely, first engage all safety precautions: disconnect the battery to prevent accidental starts, and wear gloves to protect your hands.
Locate the throttle linkage, usually connected via a clip or pin. Use appropriate tools to release it without forcing the parts.
| Step | Tool Needed | Safety Precaution |
|---|---|---|
| Disconnect clip | Needle-nose pliers | Wear gloves |
| Remove linkage | Flathead screwdriver | Ensure engine is cool |
| Inspect parts | Flashlight | Disconnect battery first |
Following these steps ensures the throttle linkage detaches without damage or injury.
Remove the Carburetor From the Intake Manifold
Where should you begin when removing the carburetor from the intake manifold? First, ensure all throttle linkages and fuel lines are detached to prevent damage. Use a wrench to carefully loosen the mounting nuts or bolts securing the carburetor to the manifold.
Keep track of hardware for reassembly. Gently lift the carburetor straight up, avoiding tilting to prevent debris from entering the manifold. Consider placing a clean cloth over the intake opening once the carburetor is removed.
This step is crucial because any contamination can compromise carburetor efficiency later. These ideas ensure you maintain the integrity of your engine components during removal and prepare the carburetor for inspection or replacement.
Always work methodically to preserve parts and optimize performance after reinstallation.
Inspect and Clean the Carburetor
When should you inspect and clean the carburetor to ensure optimal engine performance? You should perform carburetor inspection during routine maintenance or if you notice poor engine idling, hesitation, or fuel inefficiency. This step is critical in an accurate fuel system diagnosis to pinpoint issues.
Follow these steps for effective inspection and cleaning:
Follow these steps to thoroughly inspect and clean your carburetor for optimal engine performance.
- Check for visible dirt, varnish, or debris clogging jets and passages.
- Inspect gaskets and seals for cracks or deformation.
- Test the float operation for proper fuel level regulation.
- Use carburetor cleaner spray to dissolve deposits inside the throat and jets.
- Blow compressed air through all passages to ensure they’re clear.
Thorough cleaning restores fuel flow and prevents engine performance degradation.
Troubleshoot Common Carburetor Removal Issues
After inspecting and cleaning the carburetor, you might encounter challenges during its removal that can hinder progress or cause damage. First, if bolts are seized, apply penetrating oil and allow it to soak before attempting removal to prevent stripping.
Avoid forcing parts, as carburetor myths often suggest brute strength is needed; this can damage mounting surfaces and affect fuel efficiency later. Disconnect all linkages carefully to prevent bending throttle arms.
If the carburetor seems stuck due to gasket adhesion, gently pry with a plastic tool to avoid sealing surface damage. Lastly, watch for fuel lines under pressure. Depressurize the system to avoid spills.
Addressing these issues methodically ensures safe removal and preserves components critical to maintaining optimal fuel efficiency.
Reinstall or Replace the Carburetor
How do you guarantee a carburetor is properly reinstalled or replaced to maintain engine performance? Start by ensuring all mounting surfaces are clean and free of debris; ignoring this is an irrelevant topic that can cause leaks. When reinstalling, align the carburetor carefully to avoid damage. Follow these steps precisely:
- Replace gaskets and seals to prevent air leaks.
- Torque mounting bolts to manufacturer specifications.
- Reattach linkages and fuel lines securely.
- Adjust the idle mixture screws as per engine requirements.
- Test engine performance and check for vacuum leaks.
Avoid confusing this process with unrelated concepts like fuel injection systems. Proper reinstallation or replacement ensures optimal fuel-air mixture delivery, preserving engine efficiency and longevity.
Frequently Asked Questions
What Symptoms Indicate a Carburetor Needs Removal?
You’ll notice rough idling, poor acceleration, or black smoke, indicating feasibility concerns for carburetor removal. Also, check for warranty implications before proceeding, ensuring that you don’t void coverage by attempting repairs yourself.
Can I Remove a Carburetor Without Mechanical Experience?
You can’t just wing it; without mechanical experience, removing a carburetor, key in carburetor history and sensitive to fuel additives, requires precision. Study manuals carefully, use proper tools, and understand fuel systems to avoid costly mistakes or damage.
How Long Does Carburetor Removal Typically Take?
The removal duration typically takes 30 to 60 minutes, depending on your experience and vehicle model.
Common symptoms prompting removal include rough idling, poor acceleration, or flooding, which signal carburetor malfunction and need for inspection.
Are There Safety Precautions for Handling Fuel During Removal?
You shouldn’t underestimate safety gear during carburetor removal; always wear gloves and goggles. Fuel spillage risks fire and skin contact, so work in a ventilated area. Keep a fire extinguisher nearby, and promptly clean spills.
What Are Common Carburetor Types for Different Vehicles?
You’ll encounter carburetor types like single-barrel, two-barrel, and four-barrel, each designed for specific fuel system designs. Proper carburetor maintenance depends on recognizing these types to optimize engine performance and fuel efficiency.