How to Check Brake Pads Without Removing Wheel
You can check brake pads without removing the wheel by looking through the wheel spokes. Turn your steering wheel fully to one side for better access. Use a flashlight or small mirror to illuminate and see the pad thickness near the caliper.
If the pads are less than a quarter inch thick, cracked, or uneven, they likely need replacement. Keep an eye out for any grinding noises or pulling while braking. More details will help you assess your brakes accurately and safely.
Key Takeaways
- Look through the wheel spokes to locate the brake rotor and pads near the caliper for a direct visual inspection.
- Turn the steering wheel fully to one side to increase access to the brake components through the wheel openings.
- Use a bright flashlight and a small mirror to illuminate and inspect pad thickness and surface condition through the spokes.
- Identify pad wear by checking if thickness is less than a quarter inch or if cracks, glazing, or uneven wear are visible.
- Use optional brake pad gauges or digital calipers through the openings for precise measurement without removing the wheel.
How to Check Brake Pads Without Removing the Wheel
Wondering how to check your brake pads without removing the wheel? You can get a good look by peering through the spaces in your wheel’s rim. Start by turning your steering wheel fully to one side; this often gives better access to the brake components.
Look for the brake caliper, which houses the pads pressing against the rotor. The pad thickness is what you want to assess. If it’s less than a quarter inch, it’s time to plan a replacement.
While inspecting, watch for uneven wear or cracks. If you spot any irregularities, don’t ignore them. Regularly checking this way helps you spot issues early, keeping your braking efficient and safe without the hassle of removing the wheel.
Tools Needed to Inspect Brake Pads Without Removing the Wheel
To check your brake pads without removing the wheel, you’ll need a few essential tools like a flashlight and a jack to safely lift the car. Optional devices like a brake pad gauge can help you measure pad thickness more accurately.
Having the right tools makes the inspection quicker and more reliable.
Essential Inspection Tools
Several key tools make inspecting your brake pads without removing the wheel straightforward and efficient. First, a flashlight is essential to illuminate the brake assembly through the wheel openings, letting you see the pad thickness clearly.
A mirror with an extendable handle helps you view hard-to-see areas behind the brake rotor. You’ll also want a tire iron or lug wrench to slightly loosen lug nuts if needed, ensuring easier access or minor adjustments.
Lastly, gloves protect your hands from dirt and sharp edges during the inspection. These basic tools provide the visibility and safety you need to assess your brake pads quickly, without the hassle of removing the wheel. Keep them handy for regular brake maintenance checks.
Optional Measurement Devices
How can you get a precise measurement of your brake pad thickness without removing the wheel? Optional measurement devices like a brake pad gauge or a digital caliper can help.
These tools let you measure the pad’s thickness through the wheel spokes or inspection holes, giving you accurate readings without hassle. A brake pad gauge is simple and affordable, designed specifically for this task.
Digital calipers offer even more precision and versatility if you already have one in your toolbox. Using these devices ensures you catch wear early, preventing costly repairs.
While not essential, they add confidence to your inspection, especially if you’re unsure about visual estimates. Investing in one can save time and keep your brakes in top shape.
How to Locate Your Brake Pads Through the Wheel Openings
Wondering where exactly your brake pads sit when you look through your wheel? It helps to understand the basic layout first. Here’s how to quickly locate them:
- Find the wheel spokes, your viewing windows to the brake system.
- Look behind the spokes to spot the brake rotor, a shiny metal disc.
- The brake pads are positioned on either side of this rotor, clamping it when you brake.
- Focus on the area closest to the caliper, which holds the pads in place.
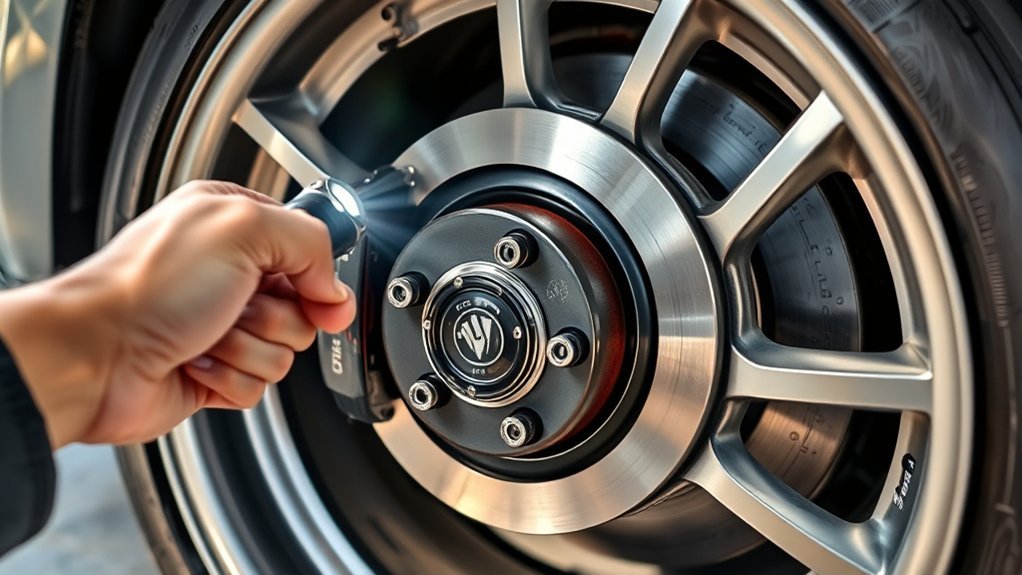
Using a Flashlight or Mirror to See Brake Pads Clearly
Grab a bright flashlight with a focused beam to light up tight spaces around your brake pads. Use a small mirror to angle your view, especially if direct sight is blocked.
Together, these tools help you spot wear indicators and gauge pad thickness without removing the wheel.
Choosing The Right Flashlight
Why does choosing the right flashlight matter when checking your brake pads? Because proper lighting helps you see clearly without removing the wheel, making the inspection easier and safer.
You need a flashlight that’s bright, portable, and adaptable to tight spaces.
Here’s what to look for:
- Brightness: Aim for at least 200 lumens to illuminate dark areas effectively.
- Size: Choose a compact flashlight that fits comfortably in your hand and can reach confined spots.
- Beam Type: A focused or adjustable beam helps you direct light exactly where you need it.
- Power Source: Opt for rechargeable batteries to avoid interruptions and save money.
With the right flashlight, spotting brake pad wear becomes quick and hassle-free.
Positioning The Mirror Correctly
Once you’ve chosen the right flashlight to brighten tight spaces, the next step is positioning your mirror to get a clear view of your brake pads. Hold the mirror at an angle where it can reflect the brake pad surface inside the wheel well.
You might need to move it slowly until you see the metal backing plate or pad lining clearly. Use your flashlight to illuminate the area the mirror reflects, making details easier to spot.
Keep the mirror steady to avoid distorted images, and adjust your position or the mirror angle as needed. This method helps you inspect the brake pads without removing the wheel, saving time while ensuring you don’t miss any critical wear or damage.
Identifying Brake Pad Wear
How can you tell if your brake pads need replacing without removing the wheel? Use a flashlight or mirror to get a clear view of the brake pads through the wheel spokes. Here’s how to identify wear effectively:
- Shine the flashlight directly onto the brake caliper and pads to see their thickness clearly.
- Use the mirror to reflect light into hard-to-see spots, enhancing visibility.
- Look for brake pads thinner than 3 millimeters; this indicates they’re worn out.
- Check for uneven wear or cracks on the pad surface, which signal replacement is needed.
How to Spot Wear Indicators on Brake Pads Visually
Where exactly should you look to spot wear indicators on your brake pads? Focus on the edge of the brake pad material visible through the caliper. Most brake pads have a small metal tab called a wear indicator attached to the backing plate.
When the pad wears down to a certain level, this tab makes contact with the rotor, creating a squealing sound to alert you. Visually, you’ll notice the wear indicator as a thin, raised strip along the pad’s surface.
If the pad material is flush with or below this strip, it’s time to replace the brake pads. Keep in mind, wear indicators differ by vehicle, but spotting that metal tab is key to quickly assessing pad condition without removing the wheel.
How to Measure Brake Pad Thickness Without Removing the Wheel
Wondering how to measure brake pad thickness without removing the wheel? You can do it quickly with just a few tools and steps. Here’s how:
- Use a flashlight to illuminate the brake caliper area clearly.
- Locate the brake pads through the caliper’s opening; you’ll see the friction material pressed against the rotor.
- Take a brake pad gauge or a small ruler, then carefully insert it between the caliper and rotor to measure the pad’s thickness.
- Note the measurement. Most brake pads start at around 10-12mm and should be replaced once they’re below 3mm.
This method helps you gauge pad health without the hassle of wheel removal, keeping your brake check efficient and straightforward.
How to Check for Uneven Brake Pad Wear Without Removing the Wheel
Curious if your brake pads are wearing unevenly without taking off the wheel? Start by visually inspecting the brake caliper through the wheel spokes. Look closely at the brake pad edges that are visible. Check if one side appears thinner than the other. You might need a flashlight for better visibility.
Uneven wear often shows as one pad side being noticeably more worn. Also, listen for unusual noises like squealing or grinding when braking, which can hint at uneven wear. While this method isn’t as precise as removing the wheel, it gives a quick indication.
If you spot signs of uneven wear, it’s best to schedule a thorough inspection to avoid brake performance issues.
Common Brake Pad Damage Signs Visible Without Removing the Wheel
How can you tell if your brake pads are damaged without removing the wheel? Look closely through the wheel spokes for these common signs:
- Thin Brake Pads: If the pad material looks less than 1/4 inch thick, it’s time for a closer inspection or replacement.
- Visible Cracks or Glazing: Shiny or cracked surfaces on the pads indicate wear or overheating.
- Uneven Wear: Notice if one pad looks thinner than the other. This can cause braking issues.
- Metal Contact: If you see metal parts touching the rotor, it means the pads are completely worn out and could damage the rotor.
When to See a Mechanic After Inspecting Your Brake Pads
After spotting any signs of brake pad wear through your wheel spokes, you might be tempted to keep driving a bit longer. However, if you notice deep grooves, excessive thinning, or hear grinding noises when braking, it’s time to see a mechanic immediately.
Also, if your brake pedal feels soft or your vehicle pulls to one side when stopping, don’t delay professional inspection. These symptoms indicate that your brake pads or other braking components may be severely worn or damaged, posing safety risks.
Even minor wear signs warrant a mechanic’s evaluation to prevent further damage. Remember, timely professional checks ensure your brakes work effectively, keeping you and others safe on the road.
Don’t wait. Schedule a mechanic visit as soon as you detect any concerning signs.
Frequently Asked Questions
What Types of Brake Pads Are Best for Different Driving Conditions?
You’ll want ceramic pads for everyday driving. They’re quiet and durable. For aggressive or performance driving, choose semi-metallic pads.
If you face wet or off-road conditions, organic pads offer better initial bite and less noise.
How Often Should Brake Pads Be Replaced Under Normal Driving?
You should replace your brake pads every 30,000 to 70,000 miles under normal driving. However, check them regularly since wear varies by driving habits, conditions, and pad material to keep your brakes safe and effective.
Can Worn Brake Pads Damage Other Brake System Components?
Worn brake pads are like a weak link in a chain. They can damage other brake components by causing metal-on-metal contact, overheating, and uneven wear. You’ll want to replace them promptly to protect your entire braking system.
What Are the Costs Associated With Replacing Brake Pads?
You’ll usually pay between $100 and $300 for brake pad replacement, depending on your car and labor rates. High-performance pads or luxury vehicles can cost more, so it’s smart to get a few quotes before deciding.
How Do Brake Pad Materials Affect Braking Performance and Noise?
You’ll notice that ceramic pads offer quieter braking and less dust, while metallic pads provide better heat dissipation and performance but can be noisier.
Organic pads are quieter but wear faster and may fade under heavy use.
Conclusion
So, now you’re basically a brake pad detective without even breaking a sweat—or removing a wheel. Who knew checking brake pads could be this easy?
If your pads look thinner than your patience during rush hour, maybe it’s time to call a mechanic instead of playing auto doctor. Remember, ignoring those wear signs won’t make your brakes better, but it might make your next stop a lot more exciting.
Stay safe, not sorry! When it comes to brake maintenance, knowing how to check brake pads without removing the wheel can save you time and keep you secure on the road.