How to Change Wheel Bearings on a Trailer
To change wheel bearings on your trailer, start by parking on a flat surface and gathering essential tools like a jack, wrench, and grease.
Removing the wheel, dust cap, cotter pin, and castle nut is the next step. Then, pull off the hub to access the bearings.
Clean all parts thoroughly and inspect them for any damage. Pack new bearings with grease and install them carefully. Reassemble everything while adjusting the spindle nut to avoid play or binding.
Keep following for tips on inspection, installation, and maintenance. This will help ensure your trailer’s wheel bearings stay in good condition and perform safely.
Key Takeaways
- Park the trailer on a flat surface, engage the parking brake, and chock the wheels before starting the bearing replacement.
- Remove the wheel, dust cap, cotter pin, and castle nut to access and remove the old bearings carefully.
- Clean the hub and spindle thoroughly, and inspect for damage or wear on bearings, races, and spindle surfaces.
- Fully pack new bearings with grease, install them with the grease seal, and mount the hub back onto the spindle.
- Adjust the spindle nut to eliminate play without binding, then spin the hub to ensure smooth rotation before reassembling.
Preparing Your Trailer and Tools for Wheel Bearing Replacement
Where should you begin when changing wheel bearings on your trailer? Start by parking your trailer on a flat, stable surface. Engage the parking brake and chock the wheels to prevent any movement.
Next, gather all necessary tools: a jack, jack stands, lug wrench, socket set, and a bearing grease packer if you have one. Don’t forget safety gear like gloves and eye protection.
Inspect your trailer for any visible damage or rust around the wheel hubs. Clean the area to avoid dirt contaminating the new bearings.
Make sure your replacement bearings and seals are the correct size for your trailer. Preparing properly saves time and ensures a smoother, safer bearing replacement process.
When you’re set up, you’re ready to move on to removing the old bearings.
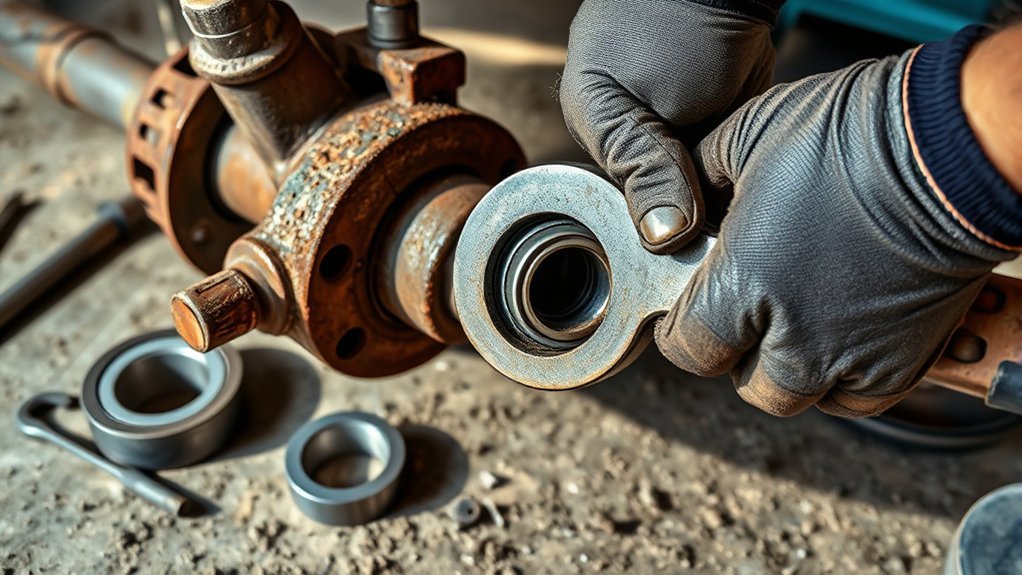
Removing Old Wheel Bearings From Your Trailer
Once you’ve prepared your trailer and gathered all the necessary tools, you can begin removing the old wheel bearings. Start by loosening the lug nuts and removing the wheel. Then, take off the dust cap using a screwdriver or hammer carefully.
Next, remove the cotter pin and loosen the castle nut; don’t lose these small parts. Finally, pull the hub off the spindle to access the bearings.
Remember to:
- Keep track of all removed parts in order.
- Handle bearings gently to avoid damage.
- Work on one wheel at a time to avoid confusion.
Cleaning and Inspecting Trailer Hub Components (Including Diagnosing Bearing Damage)
How do you know if your trailer hub components are still in good shape? Start by thoroughly cleaning the hub, spindle, and bearing surfaces with a solvent or degreaser to remove old grease and dirt.
Once clean, inspect the hub for cracks, corrosion, or grooves. Check the spindle for signs of pitting or wear. Examine the bearings carefully—look for discoloration, scored rollers, or excessive play. Damaged bearings often show signs of overheating, like a blue tint or burnt smell. Also, spin the bearings; roughness or grinding indicates they need replacement.
Don’t forget to inspect the races inside the hub. Any rough spots or grooves mean they’re compromised. If you spot any defects, it’s best to replace those parts before reassembling to ensure safe trailer operation.
Installing New Wheel Bearings Correctly
Proper installation of new wheel bearings guarantees smooth trailer operation and prevents premature wear. Start by applying a generous layer of high-quality grease inside the hub and on the bearing surfaces. Then, carefully place the inner bearing into the hub, followed by the grease seal. Finally, insert the outer bearing before positioning the hub on the spindle.
To ensure correct installation, remember to:
- Pack bearings fully with grease to avoid overheating.
- Align the grease seal properly to prevent contamination.
- Tighten the spindle nut just enough to remove play without binding.
Once installed, spin the hub to check for smooth rotation. Avoid over-tightening, which can cause bearing damage. Taking these steps helps your trailer perform reliably and safely.
Maintaining Trailer Bearings for Longevity
After installing new wheel bearings correctly, maintaining them is key to extending their lifespan and ensuring your trailer stays safe on the road. Regularly inspect your bearings for signs of wear or damage, and repack them with fresh grease at least once a year or every 12,000 miles.
Use high-quality, waterproof grease to prevent contamination from water and dirt. Always check the seals and replace them if you notice cracks or leaks, as seals keep contaminants out.
When storing your trailer, keep it in a dry place to avoid rust and corrosion. Finally, listen for unusual noises while towing; humming or grinding sounds often indicate bearing issues.
Staying proactive with maintenance will save you from costly repairs and keep your trailer rolling smoothly.
Frequently Asked Questions
What Are the Signs of a Failing Trailer Wheel Bearing?
You’ll notice a grinding or humming noise while towing, uneven tire wear, wheel looseness, or heat coming from the hub.
If you catch these signs early, you can prevent a dangerous failure on the road.
Can I Use Car Wheel Bearings on My Trailer?
You can use car wheel bearings on your trailer only if they match the size and load rating. Otherwise, they might fail prematurely.
Always check specifications to guarantee safety and proper fit before swapping bearings.
How Often Should Trailer Wheel Bearings Be Replaced?
You should replace trailer wheel bearings every 12,000 to 15,000 miles or once a year, whichever comes first.
Check them regularly for noise, heat, or roughness, and repack with grease to extend their life.
What Type of Grease Is Best for Trailer Wheel Bearings?
Think of high-temperature marine grease as the superhero your trailer wheel bearings need. You’ll want grease that resists water, heat, and pressure to keep those bearings spinning smoothly and avoid any roadside drama.
Is It Safe to Drive With a Noisy Wheel Bearing?
No, you shouldn’t drive with a noisy wheel bearing. It can fail suddenly, causing wheel damage or accidents.
Get it inspected and replaced promptly to keep your trailer safe and avoid costly repairs down the road.
Conclusion
Now that you’ve mastered the method of maintaining and mounting new wheel bearings, you’re set to safeguard your trailer’s smooth, silent spinning.
Regularly replacing and reviewing your bearings prevents pesky problems and prolongs performance.
By being bold and brave with your bearings, you’re building a better, safer journey every time you tow.
Keep caring for your components, and you’ll conquer the road with confidence and calm, cruising carefree wherever you go.
Remember, changing wheel bearings on a trailer is key to ensuring safety and longevity on every trip.